Virgo Employee Portal Setup
The Employee Portal provides configurable, real time, read-only views into your organization's record retention information. The Employee Portal lets employees in your organization find Virgo retention information easily, but without the additional cost and effort of creating multiple Virgo read-only user accounts.
The Employee Portal views can be hosted on an organization's intranet, employee portal, custom solution, or Microsoft 365. For example, an organization may host the Retention Schedule view on a SharePoint site.
The Employee Portal views also support several implementation options.
 This Help topic includes the following sections:
- A Virgo subscription or trial.
- The Virgo Employee Portal supports Edge, Chrome, Safari, and Firefox.
- A Virgo user with the Administrator or Portal Administrator role. This is usually the person responsible for maintaining the content on your organization's intranet. This user can configure the Employee Portal and manually log onto the Employee Portal.
- A Virgo user with the Portal User or Portal User Plus role. The Employee Portal accesses the Virgo retention information via a single Portal User or Portal User Plus account. This Virgo user account is used to automatically log into Virgo on behalf of all your employees and provide employees read-only access to the Employee Portal.
NOTE: Your employees do not need to know the username or password for the Portal User or Portal User Plus accounts.
In addition to the requirements above, SharePoint implementations also require:
- SharePoint Online (Office 365).
- Full Control or higher permissions on your organization's SharePoint site.
The table below describes the Employee Portal roles.
| Role Name | Description | Portal Configuration |
| Administrator | Virgo admin with full control of all tabs except the Citations tab. Full control of Admin subtabs including those related to user management. Access to Employee Portal Admin View and the Configure button for views. Also has read-only access to the Record Schedule and Content Types views in the Portal. | Full Control |
| Portal Administrator | Virgo Employee Portal admin with access to Admin View and the Configure button for views. Also has read-only access to the Record Schedule and Content Types views in the Portal. | Full Control |
| Portal User | Virgo Employee Portal user with read-only access to the Record Schedule and Content Types views in the Portal. | None |
| Portal User Plus | Virgo Employee Portal user with read-only access to the Record Schedule and Content Types views in the Portal. Also has read-only access to Record Series and Repositories fields (if enabled) for Content Types views. | None |
- Click the Admin link.
- Click the Users tab.
- Click New.
- Enter the First Name and Last Name. We recommend using Employee as the first name and Portal as the last name. If you need multiple portal accounts, then you may want to specify a unique portal identifier in the First Name field.
- Enter and confirm the User Name. The user name should clearly identify the portal since this is what you will readily see in the audit trails. The user name must be in the form of an email address, but it does not need to be an active email account. For example, you could use portal@company.com, emea.portal@company.com, sharepoint@company.com, etc.
- In Generate Password, Click Yes to automatically generate a password. Or enter and confirm the Password according to the password rules on screen. We recommend a long password since this is a service account that will not need to be entered often.
- In Role, select Portal User, or Portal User Plus.
- Click Save.
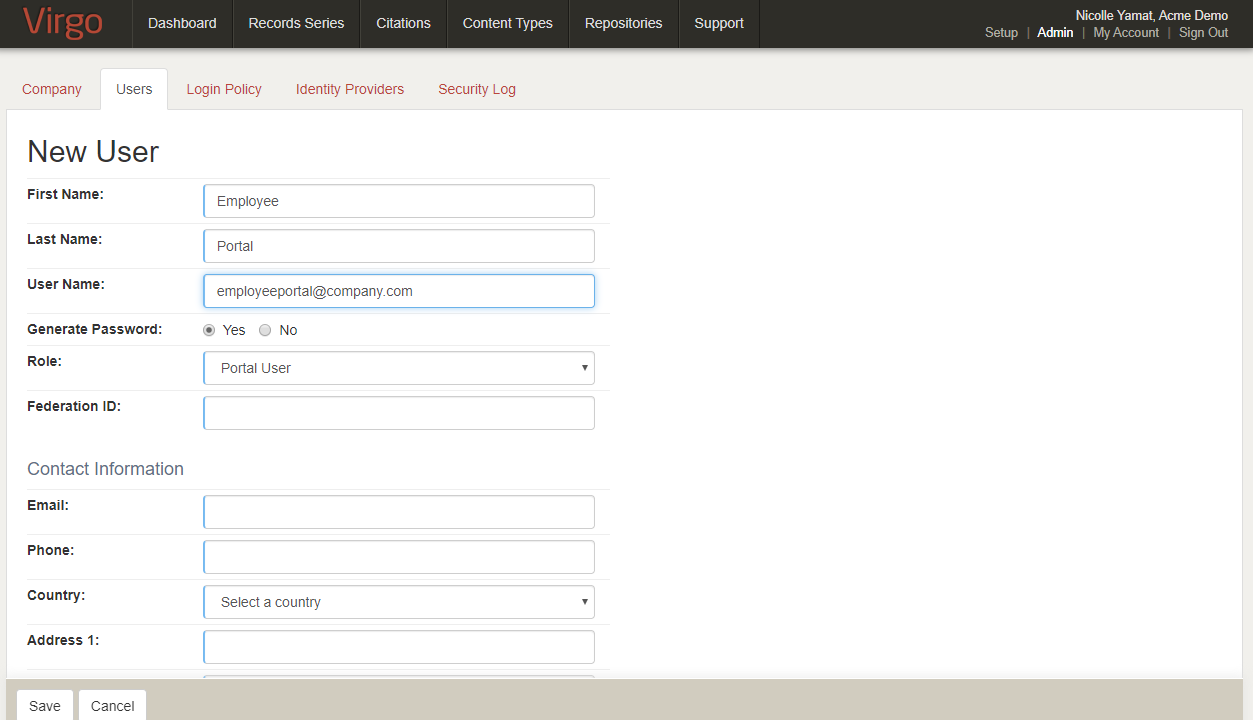 To view an example of adding a portal user, hover your mouse over the image.
There are three implementation options for the Employee Portal views: display on your organization's web page (for example, an employee portal), display within an inline frame on a web page, or be embedded into a SharePoint site page.
The best option for your organization depends on the desired user experience and your organization's user authentication requirements.
The table below describes the Employee Portal implementation options.
| Implementation Option | Notes |
|---|---|
|
Standalone |
This option supports and requires Single Sign-On (SSO) and is the easiest implementation option for organizations that employ SSO. In this implementation, you embed a link to an Employee Portal view on a web page (for example, an employee portal) or share the link with employees. When an employee clicks the link, a single-page application displays, typically in a new tab or window. |
|
Embedded |
This option supports and requires SSO but requires more technical expertise than other options and may require assistance from our Professional Services team. In this implementation, on a web page (for example, an employee portal) you embed a link into an inline frame. The iframe displays the view to employees. |
|
In this implementation, you quickly install and deploy the Employee Portal app onto a SharePoint page (for example, an employee portal), just like any other SharePoint app. A SharePoint implementation supports either Standard Login and SSO for SharePoint. Standard Login security is managed through your organization’s own SharePoint policies. Any employee with permission to the SharePoint page has read-only access to Employee Portal views. SSO for SharePoint uses Microsoft user authentication to allow users to access to Employee Portal views. SSO for SharePoint provides an extra layer of security when compared with the Standard Login option. If your organization frequently employs SharePoint, we recommend the SharePoint option. However, SharePoint limits the size of the views and the columns that display in Employee Portal views. The Standalone implementation may be a better option if the size of the views is a consideration. |
NOTE: Our Professional Services team can assist you with SSO configuration, the implementation options, and GUID parameters for different roles or departments. If you need assistance, please contact Support.
Before implementing a standalone Employee Portal, SSO must be enabled both for Virgo and the Employee Portal. After SSO is enabled, you can embed a link to an Employee Portal view on a web page (for example, an employee portal) or share the link with employees. When an employee clicks the link, a single-page application displays, typically in a new tab or window.
The table below describes the basic URLs for a standalone Employee Portal.
NOTE: The URLs may need to be modified to include Relay States, GUID parameters and other settings specific to your Identity Provider and Virgo installation. But standalone Employee Portal URLs must include the ?_embed=false or &_embed=false parameter at the end.
You can specify if a record series displays in a Retention Schedule or Retention Search view. The Visible in Portal field on the Record Series Status page in Virgo indicates if a record series can display in an active Employee Portal view. And the Visible in Portal field on the Content Type Status page indicates if the content type displays in an active Employee Portal view.
After you have installed the Virgo Employee Portal app on your site, complete the setup.
NOTE: Standalone Employee Portal URLs must include ?_embed=false at the end.
Before implementing an embedded Employee Portal, SSO must be enabled both for Virgo and the Employee Portal. After SSO is enabled, on a web page (for example, an employee portal) you embed a link into an inline frame. The iframe displays the view to employees.
The table below describes the basic URLs for the Employee Portal views. You can embed these URLs within HTML <iframe> tags. The URLs may need to be modified to include Relay States, GUID parameters and other settings specific to your Identity Provider and Virgo installation.
You can specify if a record series displays in a Retention Schedule or Retention Search view. The Visible in Portal field on the Record Series Status page in Virgo indicates if a record series can display in an active Employee Portal view. And the Visible in Portal field on the Content Type Status page indicates if the content type displays in an active Employee Portal view.
The table below describes the basic iframe HTML code for each Employee Portal view. Click Copy to copy and paste the code.
| View | URL |
|
Copy
|
|
|
Copy
|
|
|
Copy
|
|
|
Copy
|
In this implementation, you quickly install and deploy the Employee Portal app onto a SharePoint page, just like any other SharePoint app.
This section includes the following subsections:
Contact Support to install the Virgo Employee Portal app.
TIP: Each installation of an app part can display one of the Employee Portal views (Retention Schedule, Retention Search, Content Types, Content Type Search). You can combine the views in numerous ways, such as having the views all on one page, or one per page with links between the views.
The table below describes the basic URLs for the Employee Portal views in SharePoint.
NOTE: The URLs may need to be modified to include Relay States, GUID parameters and other settings specific to your Identity Provider and Virgo installation.
You can specify if a record series displays in a Retention Schedule or Retention Search view. The Visible in Portal field on the Record Series Status page in Virgo indicates if a record series can display in an active Employee Portal view. And the Visible in Portal field on the Content Type Status page indicates if the content type displays in an active Employee Portal view.
After you have installed the Virgo Employee Portal app on your site, complete the setup.
- Click on the Virgo Employee Portal Add-in installed to your site.
- If you have never installed it before, a new SharePoint list will be created: Information Governance Solutions, LLC. The Portal app uses this list to store your setup information.
- The setup page displays.
- For Standard Login, enter the Virgo Username and Password to use for employee access. We recommend using an account assigned to the Portal User or Portal User Plus security role. Click Save Credentials.
- For SSO, follow the instructions on the setup page, select Enable SSO for SharePoint, and then click Save Preference:


- Go back to your organization's SharePoint site to add the app parts to the pages.
NOTE: Portal app users require read access to the Information Governance Solutions, LLC list. This list is located at the root level of your organization's SharePoint site. Depending on the root site's permissions and security level, users may not have read access to the list by default. Contact your organization's SharePoint Administrator to grant access to the list.
Navigate to the page where you want to add a view.
- Click the gear icon.
- Click Add a Page.
- For example, you can title the page Records Retention Search.
- Click the plus sign and click on Records Retention Search.
- Click the pencil button to edit the view.
- Check the box re-size to fit to page and adjust the height to 600 and then click Apply.
- You will be prompted with a Virgo login screen.
- Edit the SharePoint page.
- Select the view you need to configure.
- Select Edit Web Part from the component’s menu.
- You will be prompted with a Virgo login screen. You must have a user account with the Portal Admin or Administrator role to edit the configuration (which is different from the account the portal uses to log in on behalf of your employees).
- The contents of the view will be displayed again but you will see a Configure button in the upper-right corner.
- If a view includes multiple views, the Configure button will provide a different set of options for each view. You may want to customize more than one view.
- After making changes, click Save in the configuration screen.
- You do not need to save the component or page configuration in SharePoint unless you changed any SharePoint display properties.
This section includes the following subsections:
Virgo users with the Administrator or the Employee Portal Administrator role can specify report options and the columns that display on the Retention Schedule view grid and the Content Types view grid and the detail views for employees.
For example, if you enter a term in the Filter for field, the grid will be filtered by default for other Employee Portal users.
NOTE: Use caution when specifying configuration because your configuration will be the view that other Employee Portal users will see by default.
-
On the Retention Schedule view page or the Content Types view page, click Admin View.
-
Click Configure.
-
Select the fields to display in the grid.
-
In Download Options, you can specify reports that employees can generate and the format.
-
Click Apply.
-
To add filters or change the sort order, specify filters and sort order in the grid, click Configure, review the settings, and then click Apply.
-
To change the column order, click a column heading in the grid, and then drag to the new position. Release the mouse.
-
To specify the fields that display in the details view, on the grid, double-click an item or select an item in the grid and click View Detail.
-
Click Configure.
-
Select the fields to display in the details view.
-
For the Retention Schedule view, to let employees on the Record Series Details page click content type links for more information, select Allow Content Type Drill Down.
-
Click Apply.
NOTE: If the container of your view is too narrow (a narrow column, mobile device screen, etc.), some fields may not display.
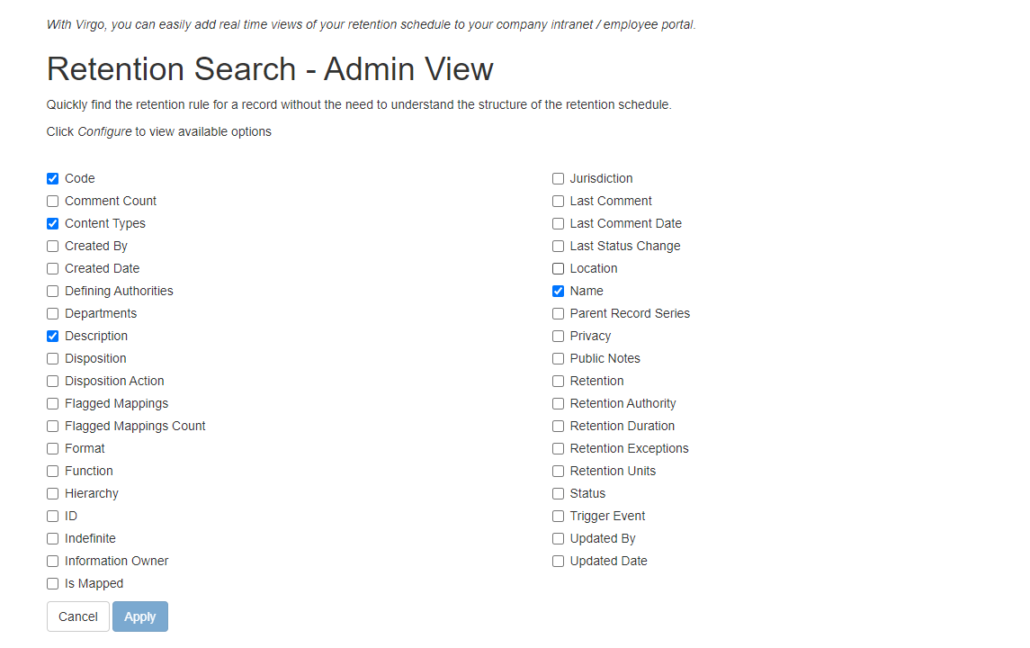
Virgo users with the Administrator or the Employee Portal Administrator role can specify the fields to search on the Retention Search view grid and the Content Types Search view grid.
-
On the view page click Admin View.
-
Click Configure.
-
Select the fields for the full text search.
 To view an example of selecting fields, hover your mouse over the image.
 NOTE: Content Types are always suggested to an employee as they type a search term even if the Content Type field is not selected for full text search.
-
Click Apply.
Virgo users with the Administrator or the Employee Portal Administrator role can create additional views of a default Employee Portal site.
This section includes the following subsections:
-
Review Views to select the type of the new view, and then review Implementing a Standalone Employee Portal to obtain the appropriate initial URL.
-
Create a new view by adding a parameter at the end of the URL: Add ?GUID=<your newGUIDname> to the end of the URL.
-
If your new view requires a heading and description, add “&_embed=false” after the GUID parameter. A heading and description will display on the top of the page after you initially configure the new view.
-
Configure the new view.
Views can be configured differently. So you may want to create different views for different scenarios. For example:
-
https://virgo.infogovsolutions.com/portal/adminRetentionSearch/retentionSchedule?GUID=adm&_embed=false creates a view with the setting named adm and displays the heading and descriptions in the configuration and on the top of the page.
-
https://virgo.infogovsolutions.com/portal/adminRetentionSearch/retentionSchedule?GUID=hr creates a view with the setting named hr without a heading or description.
-
https://virgo.infogovsolutions.com/portal/adminRetentionSearch/retentionSchedule?GUID=test1&_embed=false creates a portal with the setting named test1 and displays the heading and descriptions in the configuration and on the top of the page.
-
https://virgo.infogovsolutions.com/portal/adminRetentionSearch/retentionSchedule displays your default Employee Portal for your Retention Schedule.